Home Services

Stucco Repair Vs Stucco Remediation

Stucco repair is a budget-friendly option for minor and isolated damage. However, more widespread or severe problems may require replacement.

Inspect the stucco for cracks, chips and other signs of damage. Make note of the size and location of each problem. Chisel away any loose or damaged stucco to reveal the wire lath if necessary. Contact Stucco Repair Philadelphia now!

Even if you’ve been lucky enough to escape wildlife and water damage, the weather will eventually take its toll on your stucco. The climates in New Jersey, New York and Pennsylvania present unique challenges for stucco, including temperature fluctuations that lead to expansion and contraction. This stress can cause small cracks to widen, creating openings for moisture to penetrate. This can lead to a host of other problems, including mold growth, mildew and insect infestations. Moisture infiltration also leads to rot and structural damage.

In addition, stucco is subject to impact damage from hail and high winds. This can be exacerbated by the presence of salt air, which further stresses the material and speeds deterioration. In severe cases, impact damage may cause delamination — in which the stucco separates from the underlying structure.

While modern advances in stucco mix and application have improved its ability to resist environmental causes of damage, no exterior is impervious to weather-related issues. For instance, a poorly-installed flashing can allow water to seep through the stucco, causing rot and other serious issues. In addition, internal water leaks, such as from a burst pipe or misplaced sprinkler, can be just as damaging.

Regular inspections of your home, especially after extreme weather conditions, can help you identify potential damage before it becomes a problem. Look for signs of moisture penetration, such as stains or discoloration, and address them promptly to prevent the issue from getting worse.

In addition, routine cleaning of your stucco can remove debris and dirt that may be causing damage to the surface. A professional painting contractor can also refresh your stucco’s appearance and help to safeguard its resilience against future damage. They can re-dash the entire wall, apply a base coat or scratch coat and carefully match texture and color to ensure a seamless repair that preserves the aesthetic of your home. They can also reinforce your stucco’s moisture barrier, addressing any gaps or weak points that are susceptible to water infiltration. Keeping up with these maintenance tasks can greatly reduce the time and cost of any eventual repairs to your stucco.

DIY Repairs

While DIY repairs may be a viable option for smaller holes or cracks, large or severe damage is best left to the expertise of a licensed contractor. These professionals have the tools and experience to ensure that your stucco is well-maintained, preventing minor issues from escalating into costly repairs down the line.

If you decide to tackle a stucco repair yourself, first prepare the area by cleaning the wall with a pressure washer or scrub brush. This will help the patching compound adhere to the surface.

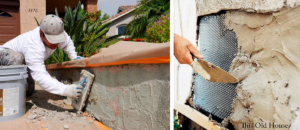
Next, remove loose or damaged stucco, taking care not to disturb the underlying wood lath support system. Then, use a hammer and chisel to break up and loosen any remaining pieces of stucco until you expose the metal mesh. Check the mesh for signs of rust or damage, and then replace it with a new piece, measuring and cutting it to size using metal snips. Secure the mesh to the wall using galvanized roofing nails.

Mix the first base coat, or “mud,” per the product instructions. Work in small sections to maintain control over the application and achieve a uniform consistency. It is essential that you wear protective gloves and eye protection while working with wet stucco to avoid burns and skin irritation.

Once the mud has reached the right texture, press it over the hole with a rubber float. Smooth the patch with a stippled tool, such as a whisk for swirls or a sponge for a smoother finish. Allow the patch to dry for at least 24 hours before painting. If necessary, you can purchase coloring pigment to pre-match the patch to the wall color.

A quality finish coat will further protect your stucco, reducing the risk of future damage from weather and other elements. Be sure to apply a sealant that is rated for exterior use and compatible with your stucco type. If you are unsure about what product to choose, ask your contractor for recommendations. They should be happy to explain the benefits and drawbacks of each, helping you find a product that will provide long-term protection for your home.

Skilled Repairs

Like a warrior shielding your home from the elements, stucco can become damaged from time to time. Painting contractors step in to patch holes, halt further deterioration, and keep your building’s integrity intact.

Stucco repair techniques rely on both precision and expertise to ensure the best results. Professional plasterers often use advanced reinforcement methods to strengthen weakened areas, preventing future damage. They also take care to match the texture of your existing stucco when applying a fresh coat, ensuring that the new material blends in with its surroundings and enhancing the appearance of the building’s exterior.

A few key signs that your stucco may need repair include musty smells, bubbling or blistering of the surface, or discoloration. These indicate that moisture is infiltrating your walls and causing structural damage, mold growth, or wood rot. It’s important to catch these problems early on by scheduling regular inspections and addressing cracks promptly.

The first step in repairing your stucco is to clean the affected area with a scrub brush and pressure washer. This removes any lingering debris and prepares the surface for the application of new stucco. After the area is dry, apply a layer of builder’s paper to help prevent water infiltration. If the structure is exhibiting structural damage, it’s also recommended to use steel mesh to support the stucco.

Next, prepare your stucco patch materials by mixing the first-coat recipe provided earlier in a wheelbarrow. The acrylic bonding agent included in this mixture enhances adhesion between the fresh stucco and the lath beneath it. If possible, work on your stucco during optimal weather conditions. Freezing temperatures wreak havoc on wet stucco, while hot, dry weather draws moisture out too quickly and prevents proper curing.

Allow your patch to dry for three days before misting it again with water. After another week, mist the patch again and let it dry for an additional two days before painting. This process helps the patch achieve full strength and promotes a long-lasting finish. When the repair is complete, the paint will also protect your building from further weather damage and stains.

Remediation

Stucco remediation is more than a repair; it’s the replacement of your entire stucco wall system to address any underlying issues. This is an in-depth process and requires the help of a professional. Stucco remediation is often used for walls that show signs of moisture intrusion. This could include cracks, deterioration of the wire lath or rust on the metal lath. Remediation can also include the addition of a weep screed to allow any moisture that gets into your home through damaged stucco to easily escape.

This type of remediation can be very expensive. The cost can also be more time consuming than a regular stucco repair, especially if the issue is located on a second or third story of a home. In order to perform a full remediation, the existing stucco must be removed, a new weep screed must be installed and the underlying structure must be repaired as well.

The location of the crack or hole in your stucco will have a large impact on the cost of remediation. Stucco repair professionals must be able to safely access the area, which may require ladders or scaffolding in some cases. If the damage is on a second or third story of your home, it will also be more difficult to reach and can require the use of specialized tools like high-powered lifts.

Before beginning the repair, you will need to clear away any dirt or other debris that is obstructing your stucco. This step is crucial as it will ensure that the new stucco adheres properly to your home. You will then need to clean the surface and prepare it for a fresh coat of stucco. It is important that you work in shaded areas and avoid hot or freezing temperatures as these conditions can affect the success of your project.

Once your stucco has been repaired, it’s a good idea to walk around your property once a month and check for any signs of wear or damage. Regular maintenance can keep small issues from turning into big problems. It’s also a good idea to seal your stucco with a breathable water-repellent product. This helps to keep moisture from entering your home and can protect it from the elements.

Plastic Manufacturing

Exploring Various Kinds of Plastic Molds

The plastic molding process starts with designing the desired product. Then, a mold or tool is created to shape and create multiple copies of the product.

Plastic Molds

Proper structure design helps lengthen the lifespan of injection molds. Slower cycle times, appropriate clamp force and temperature control also help with longevity. Read on American Plastic Molds for further info.

The rotational molding process is a popular method for creating hollow products such as tanks, containers, and pipes. It uses a powdered polymer (most commonly, polyethylene) that is placed inside of a metal mold and then slowly rotated while being heated. This allows the plastic to melt onto the walls of the mold and take on its desired shape. The rotational molding process is capable of producing larger and double-walled parts, but it has a number of disadvantages including high cycle times due to long heating and cooling cycles, limited material options, and the difficulty in incorporating certain design features such as text, writing, or symbols.

The molds used in rotational molding are typically made from aluminum or steel. This is because they must be able to withstand the high temperatures during the heating and rotational processes. The metal is also used to provide a stable base for the finished product. The molds are usually designed with a draft angle to make it easier for operators to remove the finished part from the mould once the heating, cooling, and rotational processes have been completed.

Once the plastic is molded, it must be removed from the mould and cooled. The cooling process is critical because too fast a temperature change can cause the plastic to deform or warp. A slow and steady cooling rate is preferable because it allows the polymer to cool evenly.

When the plastic is being ejected from the mould, it must be drawn away from the runner and sprue systems by components called tunnel gates. These are located on the side of the mold that opens first when the mould is cooled and rotated. The sprue and runner systems are then cut off by the machine during the cutting process.

The ejection system is important because it ensures the safe and damage-free removal of the molded plastic from the mould. This system consists of guiding and positioning components that include a sliding ejector pin, slide angle pins, sliders, and locking blocks. In addition, for molded plastic parts with lateral projections or holes, a system of components called lifters can be used to pull them away from the runner and sprue system when the mould opens.

Injection Moulding

Injection moulding is one of the most widely used production methods for making plastic parts. It is a highly efficient process that provides high precision and repeatability, along with low unit cost. It is ideal for producing large quantities of plastic products with tight dimensional tolerances, such as wire spools, plastic packaging, bottle tops, toys, combs, and chairs. It is also a great choice for producing parts that require complex designs and stringent specifications.

The injection moulding process involves the use of a plastic polymer, or resin. The molten plastic is injected into the molds under controlled pressure. The injected plastic then cools, hardens, and solidifies to form the desired shape. This method is very versatile and accommodates a wide variety of polymers, including both thermoplastics and thermosetting plastics.

To ensure that the injected plastic is evenly distributed, manufacturers use a tool called a plunger or screw to push it into the mold cavities. The amount of force required to inject the plastic is determined by the viscosity of the polymer and its shear rate. The injection speed is adjusted accordingly. The temperature of the injected plastic is also regulated to prevent overheating.

Once the molded plastic has cooled, it is removed from the molds. The molded product must be completely free from defects such as warping, sink holes, bubbles, and uneven wall thicknesses. To avoid these problems, the plastic must be cooled uniformly and the mold must have good drainage and venting.

Injection molding is a highly automated process, reducing the need for manual labor and improving quality control. However, it is not the best option for small plastic parts that need to be molded in a limited time frame, as it can cause the material to lose its elasticity.

Another disadvantage of injection molding is that it can be expensive to produce complex shapes and parts with narrow dimensional tolerances. This is because the injection machine requires expensive metal parts, such as a die and core, that are typically made through standard machining or Electrical Discharge Machining (EDM). To reduce these costs, some plastic manufacturers use aluminium moulds.

Pressure Moulding

This molding method uses a high amount of heat and pressure to transform polymers into the desired shapes. The material is placed inside a hollow mold that’s then closed and subjected to varying amounts of heat and pressure until it takes the shape of the mold. This process is often used for manufacturing larger plastic products like car bumpers. This type of molding is also commonly known as compression moulding.

While this process is useful for manufacturing large parts, it can be expensive to use and requires more time to complete than other methods of molding. Additionally, this type of molding is best suited for thicker parts such as car body panels.

The primary benefits of this process are its ability to produce a high number of identical parts and its ability to handle a wide range of materials. It can be used to manufacture both plastic and metal parts, making it a versatile option for manufacturers that need to produce a wide variety of products.

This defect occurs when the molten plastic fails to completely fill sharp internal corners or edges within the mold cavity. This can be caused by improper handling, moisture in the raw material, or inadequate injection pressure. To avoid this, optimize the injection pressure, melt and mold temperature, and venting channels to direct uniform melt flow.

Another common problem is excessive flashing, which occurs when the molded plastic extends beyond the mold’s boundary walls. This can be caused by inadequate injection pressure, excessive heat, or incorrect cooling conditions. To prevent this, optimize the injection pressure, adjust the heat and cooling conditions, and make sure that the gate is properly closed.

Another potential issue is excessive shrinkage, which can be caused by insufficient injection pressure, uneven cooling, or rapid mold shutdown. To avoid this, optimize the injection pressure and mold temperature, increase the melt flow rate if necessary, and use the proper molding conditions. In addition, ensure that the gate is properly closed and that ejector pins retract correctly. It’s also important to remember that it’s the holding pressure that determines shrinkage, not the initial injection pressure.

Sheet Moulding

Sheet molding compound (SMC) is a ready to mould glass fibre reinforced polyester material primarily used in compression moulding. It’s manufactured in a continuous in-line process by dispersing long strands of chopped fiber (typically carbon or glass) on a bath of thermoset resin, usually polyester, vinyl ester, or epoxy resin. The longer fibers give SMC a higher strength than standard bulk moulding compounds (BMC).

The resin and fillers in SMC are mixed to form a paste, which is then sheathed both top and bottom with a film to prevent auto-adhesion and placed inside the press where it’s heated and compressed. Up to 2000 psi is applied which gives the SMC enough pressure to spread and fill every part of the mold, producing a highly detailed and accurate product.

SMC is a good alternative to metal for products that require high load-bearing capabilities. It also has excellent corrosion resistance, particularly to salts and chemicals. This means SMC parts can often be used in harsh environments, such as marine applications or automotive components. This is because SMC can withstand high levels of impact and stress that would otherwise be damaging to metals.

Like other forms of composite, SMC is relatively lightweight. This allows for the production of components with a low weight and cost. This makes it an ideal material for things like bathtubs and hydrotherapy pools, as well as seating in arenas, cinemas, and stadiums. It can also be molded into complex shapes to accommodate different needs, making it an ideal alternative to traditional fiberglass.

The SMC production process is fairly quick. Once the charge has been poured into the mould, it’s heated and compressed in as little as a minute per piece. This is a big draw for producers, as it means they can produce large numbers of finished products quickly and accurately.

SMC is a very versatile plastic, able to be molded into complex designs with precise dimensions. It can even be primed in-mould to achieve a class A finish, which saves time and money on the paint finishing process. For these reasons, it’s the most popular choice for automotive exteriors and interior components.

Pest Control

Managing Outdoor Ant Hills Safely and Effectively

Pest Control Malibu involves preventing or eliminating unwanted organisms. This includes insects, rodents, and other organisms that damage plants or cause other harm.

Most pesticides are designed to affect only the target organism. However, other organisms may also be harmed by the chemicals or their residue.

Look for a company that focuses on the pest you have and uses chemicals with low risk of harming other organisms. Also, ask about their training and certifications.

Prevention

Preventive pest control is any strategy that seeks to prevent the occurrence or growth of unwanted organisms. Preventive steps can be very effective in reducing the need for pesticides. For example, keeping indoor areas free of food scraps and clutter can drastically reduce the occurrence of rodent pests such as ants and mice. Regular cleaning and prompt disposal of garbage can also decrease the likelihood of attracting insects such as flies and cockroaches.

The weather can influence the activity and numbers of some pests. For instance, some plant-eating pests are influenced by the amount of sun and shade they receive. Climate can also affect the ability of a disease to spread from one plant to another. Preventive measures might be as simple as altering the amount of water in an area or using fertilizers that are slow to break down.

Insects and mites that feed on plants or humans can be controlled by natural predators and parasites. In addition, some organisms can be used as biological controls in the form of sterilisation programmes.

Chemical pesticides may be necessary for some situations, but IPM emphasizes non-chemical and low-toxicity controls whenever possible. For example, traps, baits and physical barriers such as fences can be used in the early stages of a pest problem to remove or deter infestations before they become serious. The use of sonic devices to disrupt the mating habits of some pests can also be effective.

Before resorting to chemical control methods, it is important to determine the severity of a pest infestation. It is also a good idea to understand the habits of the pest in question. For example, knowing that a particular insect only breeds during certain times of the year can help in determining whether the situation can be tolerated until the breeding cycle ends.

An effective preventive program might include a detailed inspection of the outside and inside of a building to identify entry points and potential attractants. These areas should be sealed, as should any cracks or crevices. A schedule should be established for checking and repairing any seals that need to be replaced. Moisture problems should be corrected, as many pests thrive in wet environments. Drainage systems should be kept in good repair, and gullies should be capped to prevent sewer rat infestations. Door sweeps and tight-fitting screens can prevent many flying pests from entering a home.

Suppression

Pests are organisms that cause unacceptable damage to crop plants, livestock, structures, landscape trees and shrubs, weeds, or vertebrate animals. They also disrupt soil health, water quality and availability, displace desirable species, and adversely affect terrestrial and aquatic ecosystems (EPA 2014).

Preventive methods are economical, environmentally responsible, and keep pest populations below damaging levels. They include regularly cleaning or removing objects where pests may live, and using barriers to prevent pest access. Barriers include netting and screening in greenhouses to prevent insects that cause plant loss; putting down a layer of mulch to inhibit weeds; or installing termite, insect, or bird barriers such as spikes, owl houses, or grid wires.

Suppression methods are used when pests have already exceeded a threshold level and need to be controlled quickly. They include utilizing biological control agents, chemicals, and physical barriers. Biological control agents are natural enemies of the pest (predators, parasites, and predatory arthropods) that reduce the pest population through direct contact or indirect means. Examples of biological control agents include nematodes, bacteriophages, and plant-parasitic fungi. Chemicals such as pyrethrins, azadirachtins, and spinosads are also commonly used pesticides.

If prevention and suppression fail to keep pest populations below damaging levels, eradication methods may be necessary. This involves destroying the entire population of the pest in a targeted area. Eradication is primarily used for very serious pest problems that threaten human health or the environment.

The most common way to eliminate pests is through a combination of control techniques. Pests generally respond to different controls in a predictable manner. Frequently removing breeding sites can help deter some pests, as can spraying with the bacterial product Bacillus thuringiensis var. kurstaki, which releases the molecule lysophosphatidylcholine that breaks down an insect’s cell walls and kills it.

The most important practice homeowners can do to encourage natural enemies in their landscape is to provide them with suitable habitats and conditions. This is called conservation biological control and is done through changes in land management practices, such as reducing use of pesticides, providing suitable food for natural enemies, and limiting available water for pests. Augmentative biological control is a similar process, but uses mass-produced biological control agents that have been raised in insectaries and released in the field to augment the number or effectiveness of local natural enemies.

Eradication

In some instances, pests are so persistent that they need to be eradicated. This is a rare goal in outdoor pest situations; most of the time, prevention and suppression are better goals. However, in enclosed areas, such as homes; schools; offices; health care facilities; and food preparation and storage areas; eradication is often the aim. Examples include cockroaches; ants; rodents; and bed bugs.

A professional pest control technician is an expert in methods to stop these creatures from getting inside the building and causing damage or creating health problems for people who live or work there. They can also advise the best methods to keep these pests from entering and breeding in the first place, by limiting food, water, shelter, and other resources that they need.

To prevent pests from gaining entry to your home, check for cracks and crevices where they can enter and hide. Use caulk or put in metal wool to seal these gaps. You should also weather strip doors and windows and repair any screens that are torn or damaged. It is also important to clean up crumbs and other food sources around the house and to store any foods in sealed containers. Also, eliminate access to water by putting in drain screens over sinks and bathtubs.

Once you’ve taken preventive measures, and waited for a few weeks to see if the pests have gone away on their own, then you may want to try baits. These are chemical pest control substances that poison the pests and can be a very effective tool in preventing pests, especially in conjunction with physical traps. Only a qualified pest control technician should have access to and use these chemicals, as they are incredibly toxic to humans if ingested or inhaled. Some examples of these chemicals are pyrethrins, carbaryl, and permethrin. They are also used in combination with trap crops, such as zinnias, that lure the pests into a location where they can be killed or trapped. This type of pest control can be used in both residential and commercial settings. It can also be used in the outdoors, on crops or in natural areas to manage certain pests.

Monitoring

Pest monitoring is an important part of an IPM pest control program. This scouting, checking and identification activity lets you know what pests are present, where they are living and what damage they’re causing. By using this information you can better set action thresholds. This ensures that you don’t take action on the wrong kind of pest, that pesticides aren’t used when they aren’t needed, or that you don’t fail to act because you weren’t able to see any problem.

The monitoring process is most effective when it’s done on a continuous basis, as opposed to occasional scouting and inspections. Pests can be found in all sorts of places inside a facility or structure, making it difficult to identify them all. To help find them, your pest management professional will use a variety of tools including a flashlight. This allows them to see in dark harborage areas such as corners and crevices where pests may be hiding, and it also helps with inspecting rodent bait stations or insect light traps. An extendable mirror is another useful tool for getting behind equipment and other hard to reach spaces where pests often hide. A magnifier is also useful for identifying and inspecting pest parts, frass (excrement) or other evidence of infestation.

These tools are combined to produce a detailed pest activity report which includes a written description of the observed pest activity, a record of the type of device inspected and the number or percentage of devices inspected that had pest activity along with data about which devices were skipped and what types of pests they were. The data can then be trended over time to identify trends and determine if the levels of pest activity are decreasing or not.

In some situations, such as when a pest threatens to destroy valuable collection objects or to create an unacceptable level of damage, eradication is the goal. In other situations, such as when a pest is not causing harm, it may be possible to tolerate a certain level of pests, but this must be evaluated on a case by case basis.